Deploy and Azure Virtual Machine with Azure Resource Manager Template (ARM Templates)


We can all admit that the Azure Portal (or console) was beautifully designed and it makes us want to point and click all day to create our cloud resources. There will come a time when we want to automate and bring a little more control and consistency when we are creating cloud resources. Though there are many options such as Terraform and Pulumi, we will be focusing on Azure Resource Manager Templates or ARM Templates for short.
Before we get started with creating our very basic ARM Template to create a Virtual Machine in Azure, let us first look at some of the benefits of its benefits as opposed to manually creating our cloud resources.
Why ARM Templates?
ARM Templates fall into a category called Infrastructure as Code (IaC) which refers to expressing our cloud infrastructure as "code". This allows us to store our infrastructure configuration in version control just as we do our application code, which is very common when you have adopted a DevOps way of delivering systems to your customers. ARM Templates allow you to reliably deliver infrastructure to your application teams by defining these templates that you can feed to Azure which will then create, update, or delete portions of your infrastructure. Consider the following advantages of ARM Templates:
Declarative - You define the result that you want without describing the control flow. For example, creating an Azure resource with PowerShell would require you to individually create the pieces for that resources.
Repeatable and Consistent - ARM Templates follow the concept of being idempotent. This means that if your infrastructure is in the desired state then ARM Templates will have no effect and will not create duplicate resources if they are already present. This is great when you are deploying infrastructure at scale.
Interdependent Resource Orchestration - ARM Templates does parallelism and ordered resource creation when necessary and automatically. This frees you up as an engineer to focus on other important things.
It is very important to understand that ARM Templates only deploy the infrastructure required for your application and not your application itself. Once your infrastructure has been deployed you can look into other supporting technologies like Ansible or DSC to perform configuration management.
Let us take a look at what a basic ARM Template looks like
Anatomy of an ARM Template
Before we get started, ARM Templates are written in JSON so you can any text editor or IDE that can make this process more efficient. Personally, I use Visual Studio Code for my development.
Parameters
With the cloud being a very dynamic environment, so will your infrastructure deployments. Parameters allow you to provide dynamic values during deployment to increase the versatility of your templates. For example, the same template can be used to deploy development, staging, and production environments by simply passing different parameters.
Variables
As you build more complex infrastructures, you will need to construct dynamic values during the processing of your templates. Variables allow you to do this.
Resources
Resources refer to the Azure resources that constitute your infrastructure. For example, if your infrastructures support a web application, then you would need resources such as managed databases, and Kubernetes clusters.
Outputs
You want to return a value or a result from your deployment action, and this is known as an output. For example, you may choose to return the public IP for your Azure Virtual Machine.
There are many more features and functions of an ARM Template, but we leave it here for now. In the next section, we will create a simple template to deploy an Azure Virtual Machine.
Building our ARM Template to deploy an Azure VM
If you want to follow along in this section, you need to have the following:
An active Azure subscription
An IDE or code editor (I use Visual Studio Code) installed on your development computer
Azure PowerShell or Azure CLI installed on your development computer
First, let us create a new directory to store our code.
mkdir arm-template-demo
Then, let us create two files in this directory. One for our template, and one for our parameters.
cd arm-template-demo

ni deploy-azure-vm.json

ni deploy-azure-vm.parameters.json
For those on Mac and Linux, use the touch command instead to create the files.
Copy and paste the code below over to your code environment and let us examine the files in detail.
deploy-azure-vm.json
On lines 4 - 57 we have declared our parameters, or rather defined the structure of our parameters. Notice how we have different types of parameters such as string, object, and array. Actually, ARM Templates support, int, object, secure object, array, and string parameter types. This means that we can define any parameter we need to regardless of how complex they may be. We have included descriptions, default values, and allowed values for most of our parameters.
Disclaimer: Lines 53 and 54 are exposing very sensitive data. This is not recommended in production as there are more secure ways to achieve this, such as storing the username and password in Azure Key Vault and then reference the secrets in the template.
On lines 59-66 we defined our variables and we are using some built-in functions provided by the template. The toLower function ensures the characters are all lowercase while the concat function concatenates the multiple arguments to make one string. Also note that we nested the functions, so toLower takes the result of concat and makes that entire string a lowercase string.
On lines 67 - 213 we have defined our resources. Again, these resources are the building blocks for our infrastructure and we have declared all the resources we need to make our virtual machine work. Notice how we did not have to tell the template how to create the virtual machine. We only declared the properties we want and the Azure Resource Manager API will decide how it creates our infrastructure. This is the beauty of ARM Templates and other declarative IaC tools.
On lines 214 - 219 we have defined output for our template. The name of our output is SSHLogin and its value is a concatenation of the virtual machine username, the @ sign, and the public IP address for our virtual machine which will be determined after its creation. In essence, we should have the SSH URI for our Linux virtual machine.
deploy-azure-vm.parameters.json
On lines 4 - 8 we have declared the actual parameter value for prefix. Because we have defined default values for most of our parameters, we don't need to include them in the parameters file unless we need to. We can also pass parameters to our Azure CLI command at runtime when we are deploying our templates.
Let us deploy our template
Fire up your favorite terminal and run the following commands (I am assuming you have Azure CLI installed. If not, these commands won't work)
Create an Azure resource group so we can deploy our template.
az group create --name azure-template-demo --location eastus
Let us validate our template to ensure everything is fine before we do an actual deployment.
az deployment group validate -g azure-template-demo -n validate-arm-deployment -f .\deploy-azure-vm.json -p .\deploy-azure-vm.parameters.json
If everything is good with your template then you should get a JSON response printed to your console with information about your template and its resources.
Now it is time for us to deploy our template.
az deployment group create -g azure-template-demo -n validate-arm-deployment -f .\deploy-azure-vm.json -p .\deploy-azure-vm.parameters.json
This should take some time to complete as it is deploying all the resources we defined in our template. Once this deployment is finished, we should see a similar JSON output like when we ran the validate command.
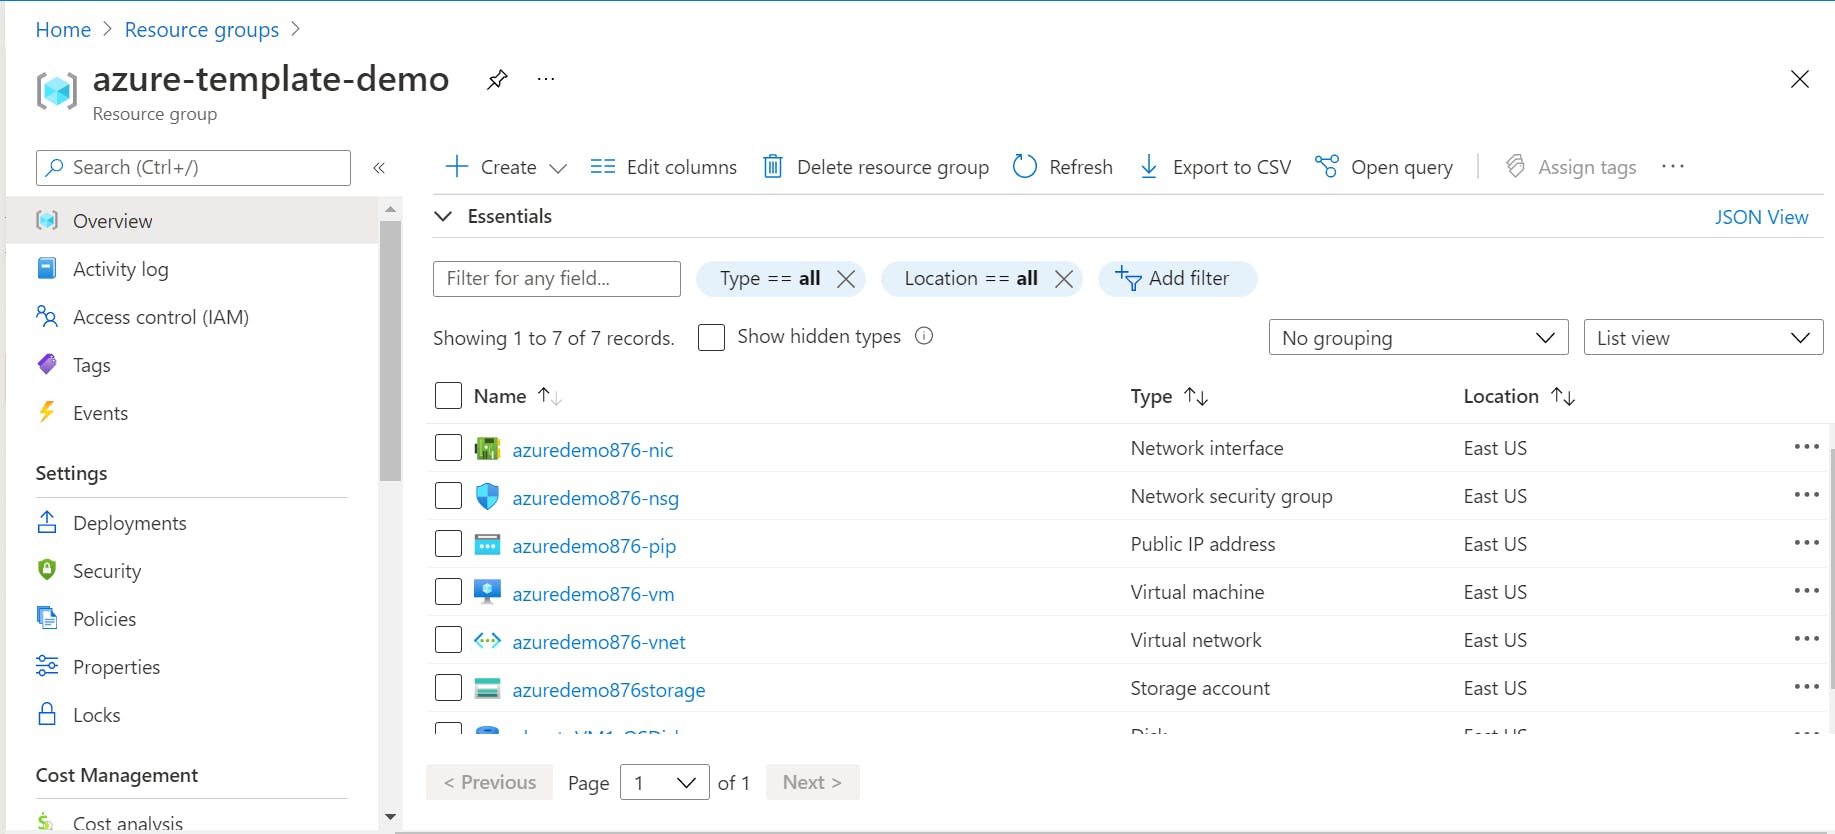
The final piece is to signing to your Azure Portal and check the resource group we created. It should look like the image below.
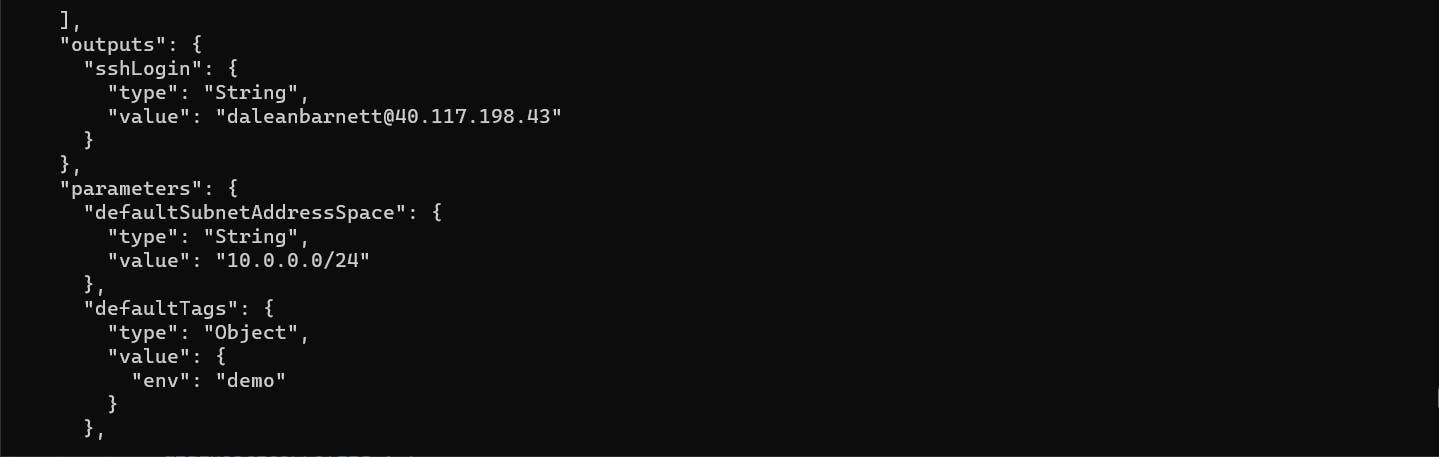
Finally, let us check the output of our template deployment. Search in your deployment JSON response and you should see the output with your SSHLogin similar to the image below.
You may now log in to your virtual machine with that URI and the password.
Conclusion
Admit it, that was a lot of trouble to deploy a single virtual machine right? Well, you may be right if you just admitted that. However, think about having to deploy dozens or even hundreds of virtual machines on a regular basis. I am sure all that time would eventually add up. ARM Templates gives you a repeatable, consistent, and predictable way to deploy your Azure infrastructure and its power comes to life when you are deploying large complex infrastructure with many moving parts.
If you want to learn more about ARM Templates and how they can help you to reduce your manual effort in creating repeatable and tested infrastructure let us get in touch.