Deploy ARM templates with GitHub Actions


In a previous article, we took a look at Azure Resource Manager (ARM) templates and how advantageous they are over GUI and imperative Azure resource deployments. In this article, we will look at using GitHub Actions to automate our template deployments to Azure. We will not be going over what ARM templates are in this article and if you want an introduction please see my previous article here.
Prerequisites and assumptions
- An active Azure subscription
- A GitHub account
- General understanding of Git and Git commands
- Azure CLI installed on your development computer
- Basic understanding of ARM templates
Let us start by creating a few resources
This article is more like a tutorial and is very hands-on and practical. Let us get started.
Create an Azure resource group using the Azure CLI.
az group create --name arm-github-actions-example --location eastus
Grab the Id of the resource group to use as the scope for the next command.
scope=$(az group show --resource-group arm-github-actions-example --query id --output tsv)
Create a service principal for use with GitHub Actions.
az ad sp create-for-rbac --name arm-github-actions-example --role contributor --scopes $scope --sdk-auth
Note the response of the command above as we will need when configuring our GitHub secrets.
Configure the GitHub repository and add the ARM template code
The ARM template code can be found here:
https://github.com/dalean5/arm-github-actions-example
I suggest that you create a local git repository so you can push the changes to GitHub later in this article.
Configure GitHub secrets
Let us configure GitHub secrets for our environment. First, select Settings > Secrets > New repository secret.
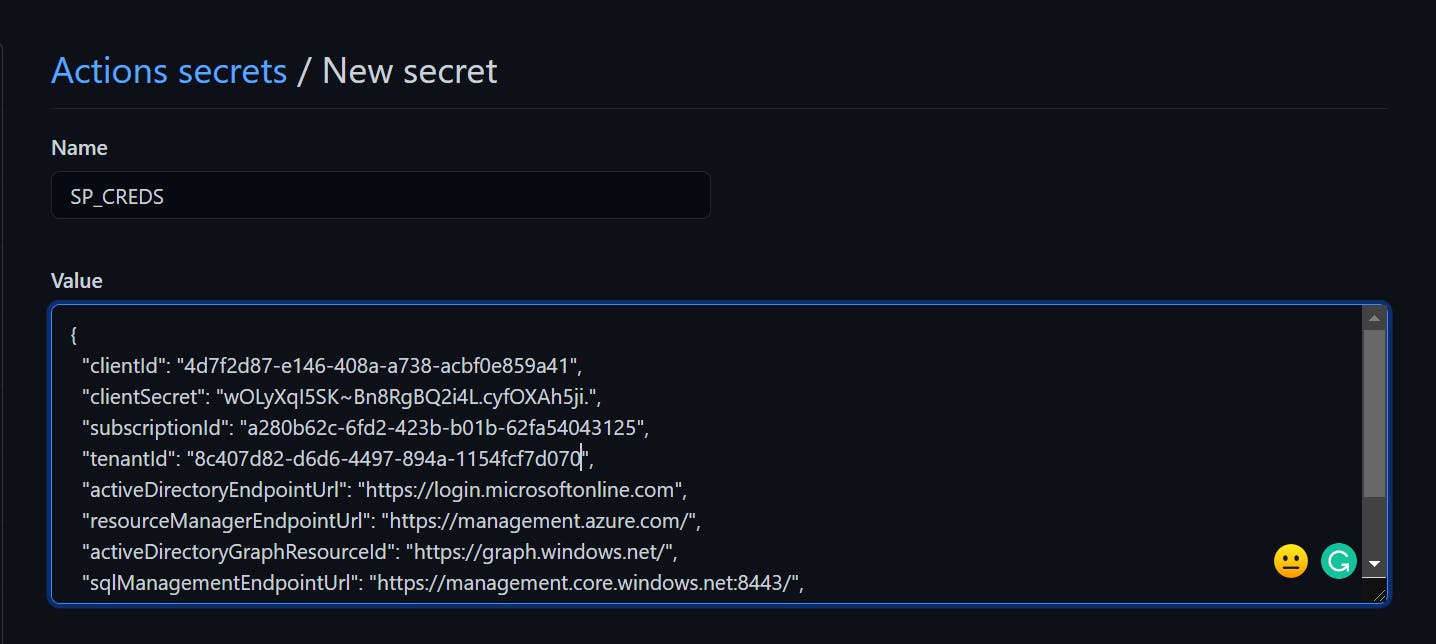
The first secret we need to create is the service principal to access Azure from our GitHub Action. Copy the result of the service principal and create a new secret called SP_CREDS.
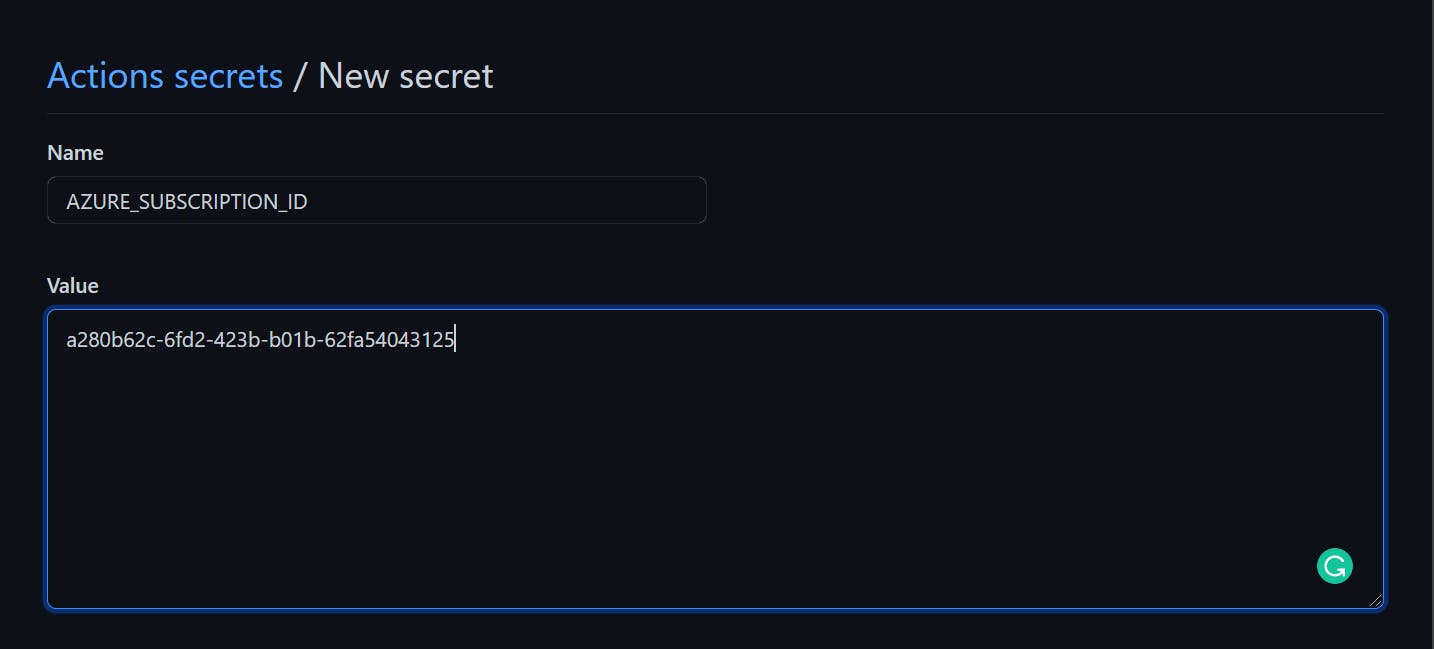
We need to also create a secret called AZURE_SUBSCRIPTION_ID.
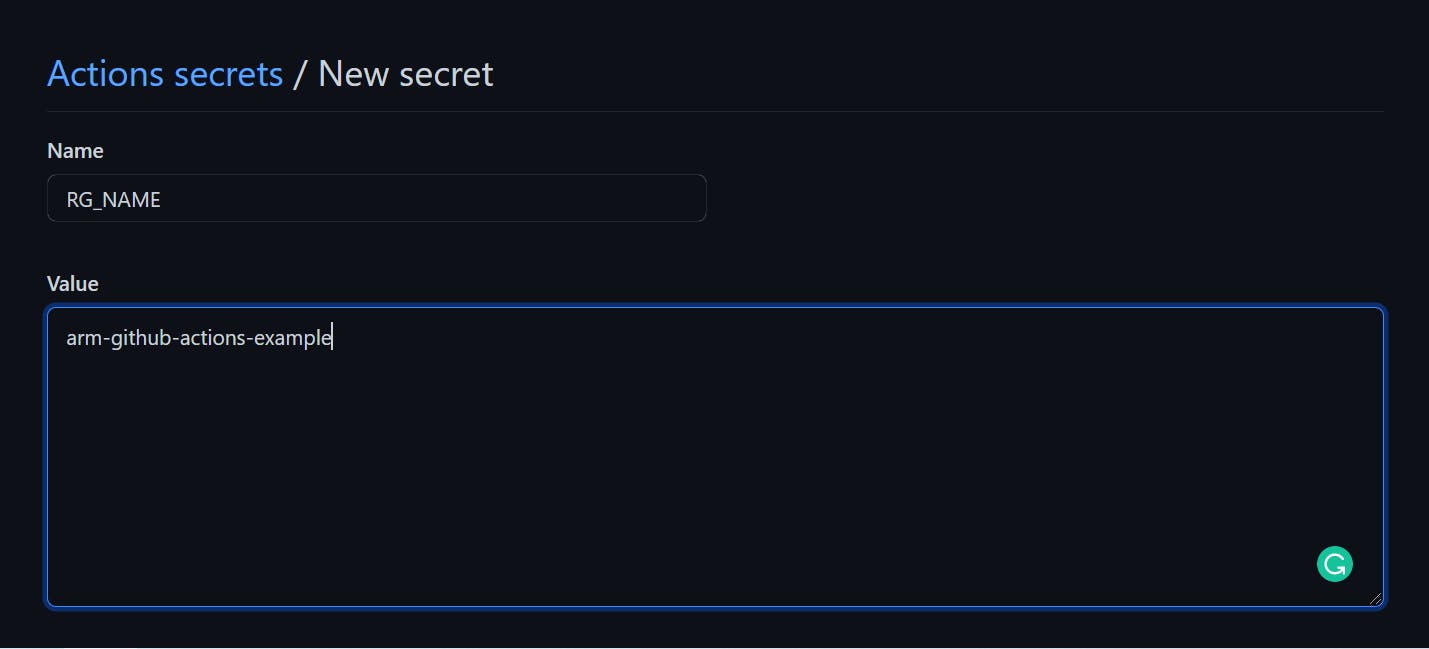
Finally, let us create a secret for the name of our resource group called RG_NAME.
Configure GitHub Actions
We will configure our GitHub Action by defining a workflow. In the code repository, we have a file located under .github > workflows > main.yaml. Let us examine this file to see what it does.
Line 1 is telling our workflow to run when changes are pushed to our Git repository.
One line 2 we are giving our workflow a name, Deploy ARM template.
Lines 3 to 24 define our jobs, though we have only one, build-and-deploy.
Lines 8 and 11 to 13 are pretty straightforward. We are checking out our code, and logging into Azure using our SP_CREDS secret respectively.
On lines 15 to 22, we are deploying our ARM template. Notice we are supplying key pieces of information using the with: object. We supplied the Id of the Azure subscription, the name of the resource group where our template should be deployed, the location of the deployment template, its associated parameters file, and a deployment name by using the unique commit SHA that triggered to workflow in that order.
Committing our code and check the results
If you have not initialized a local Git repository, please do so. We are ready to perform our first commit. From your command line run git add . to stage all changes. Run git commit -m "initial commit" to make our first commit to our Git repository. Finally, we can push our changed by running git push -u origin main.
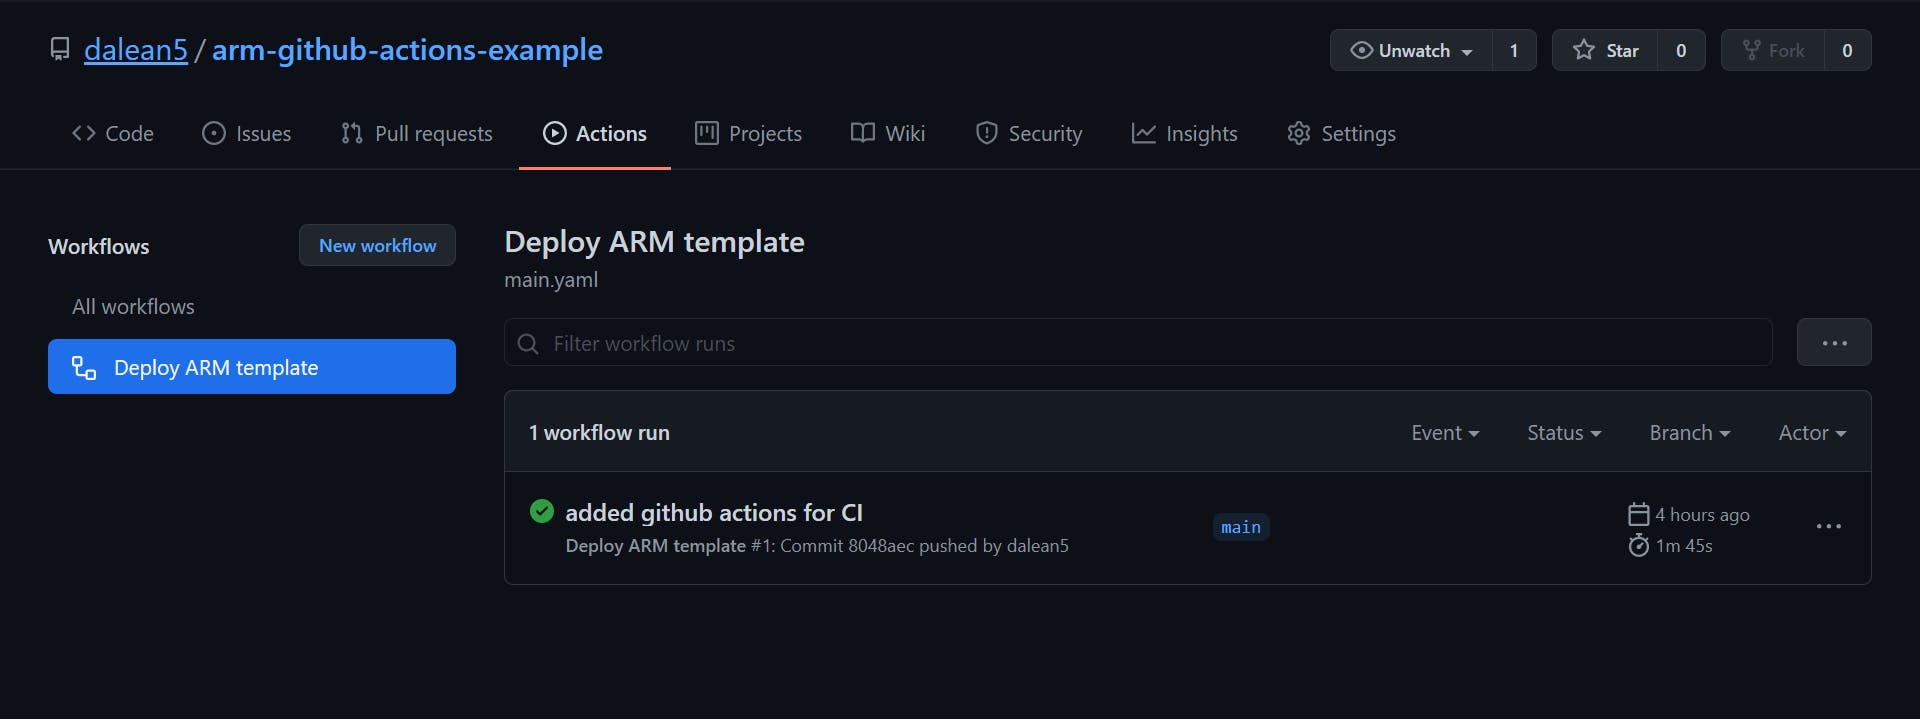
Let us head over to our GitHub repository to the Actions tab, and we should see our workflow in action. After a little wait, we should see a green checkmark to indicate that our workflow completed successfully.
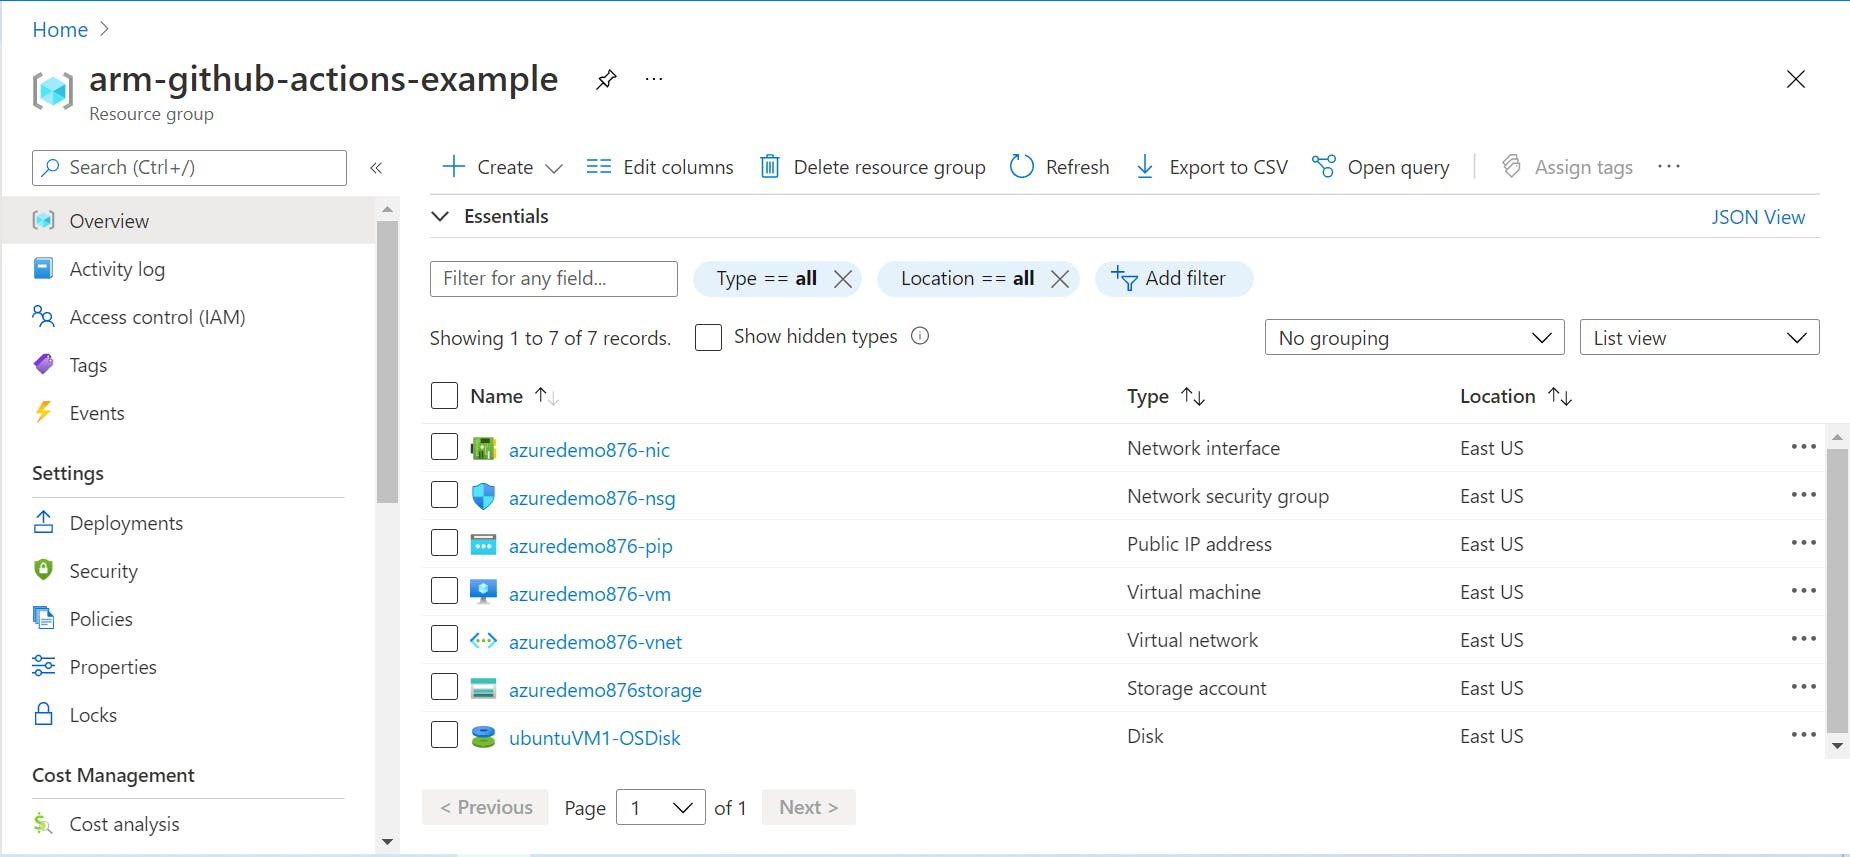
Let us head over to our Azure Portal and check our resource group for the Virtual Machine and its associated resources. If all went well as it should, we should see the following resources.
Make a change to our template and push to GitHub
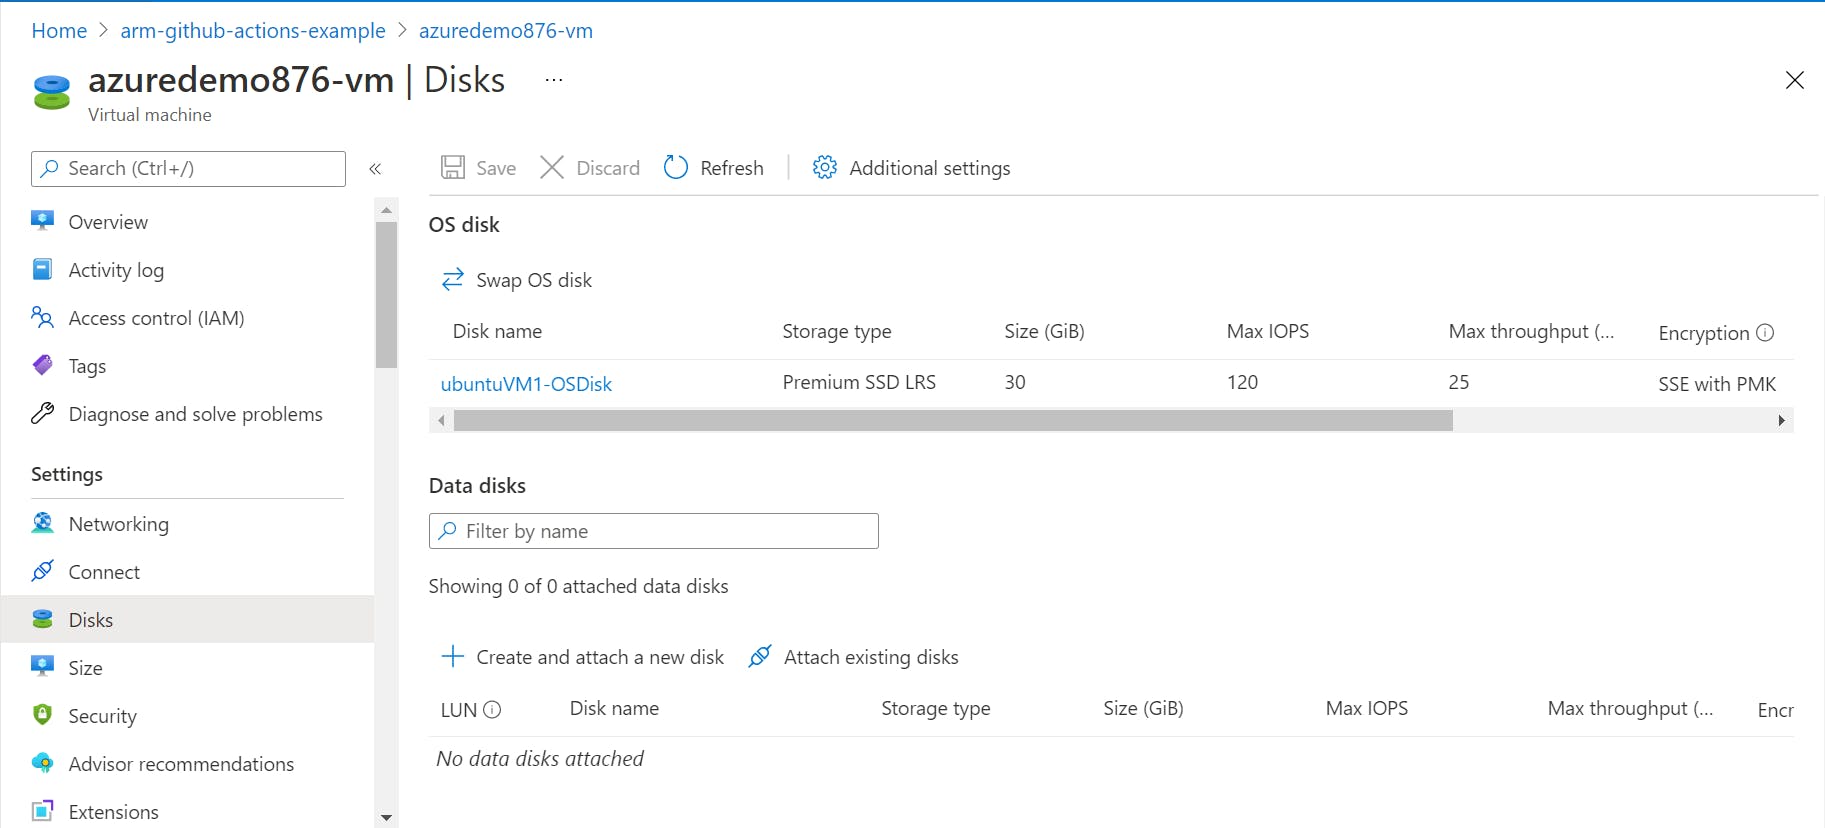
The Virtual Machine deployed using our template included the OS disk by default, but no data disk as shown in the image below.
What if we wanted to now add a data disk to our Virtual Machine. Well, all we need to do is update our template to include the new data disk, stage the changes, and commit the staged changes, and push our new changes to GitHub.
In our deploy-azure-vm.json file, add the following code at line 197.
With this insertion, the Virtual Machine resource in our template should look like the following:
Let us save, stage, commit and push our changes to GitHub. This should kick off our workflow to deploy our template to Azure and update our Virtual Machine. Let us head over to the GitHub Actions tab for our repository to see what happened.
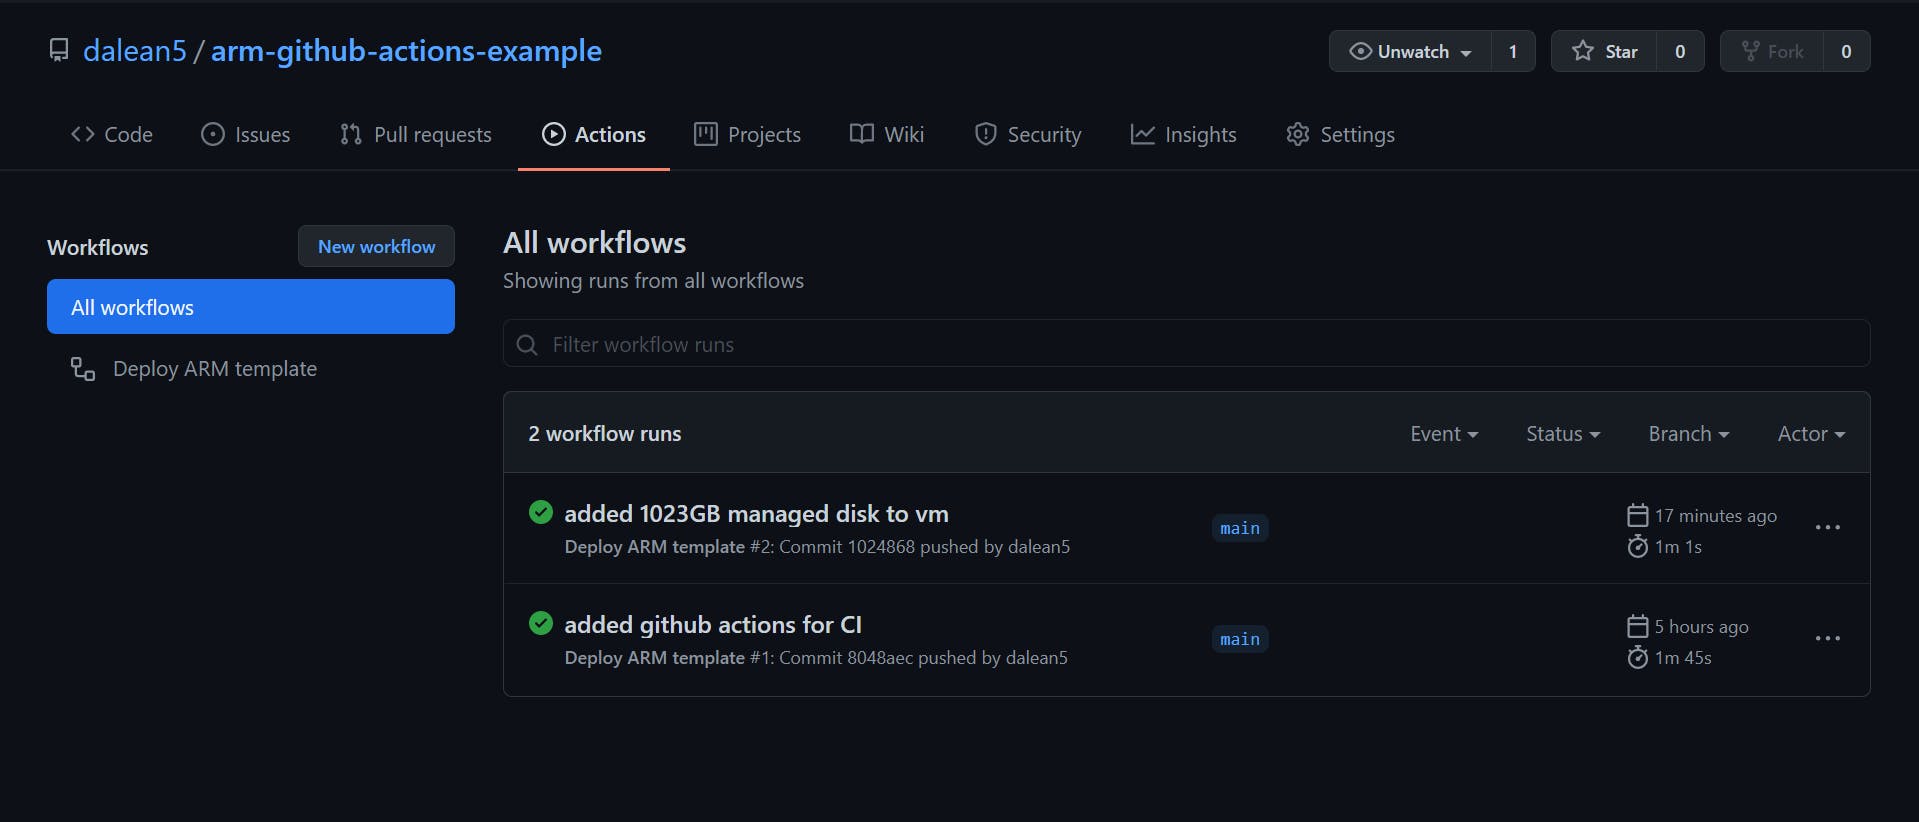
We can see that our recent changes were successful, so let us head over to the Azure Portal to see our new data disk in action.
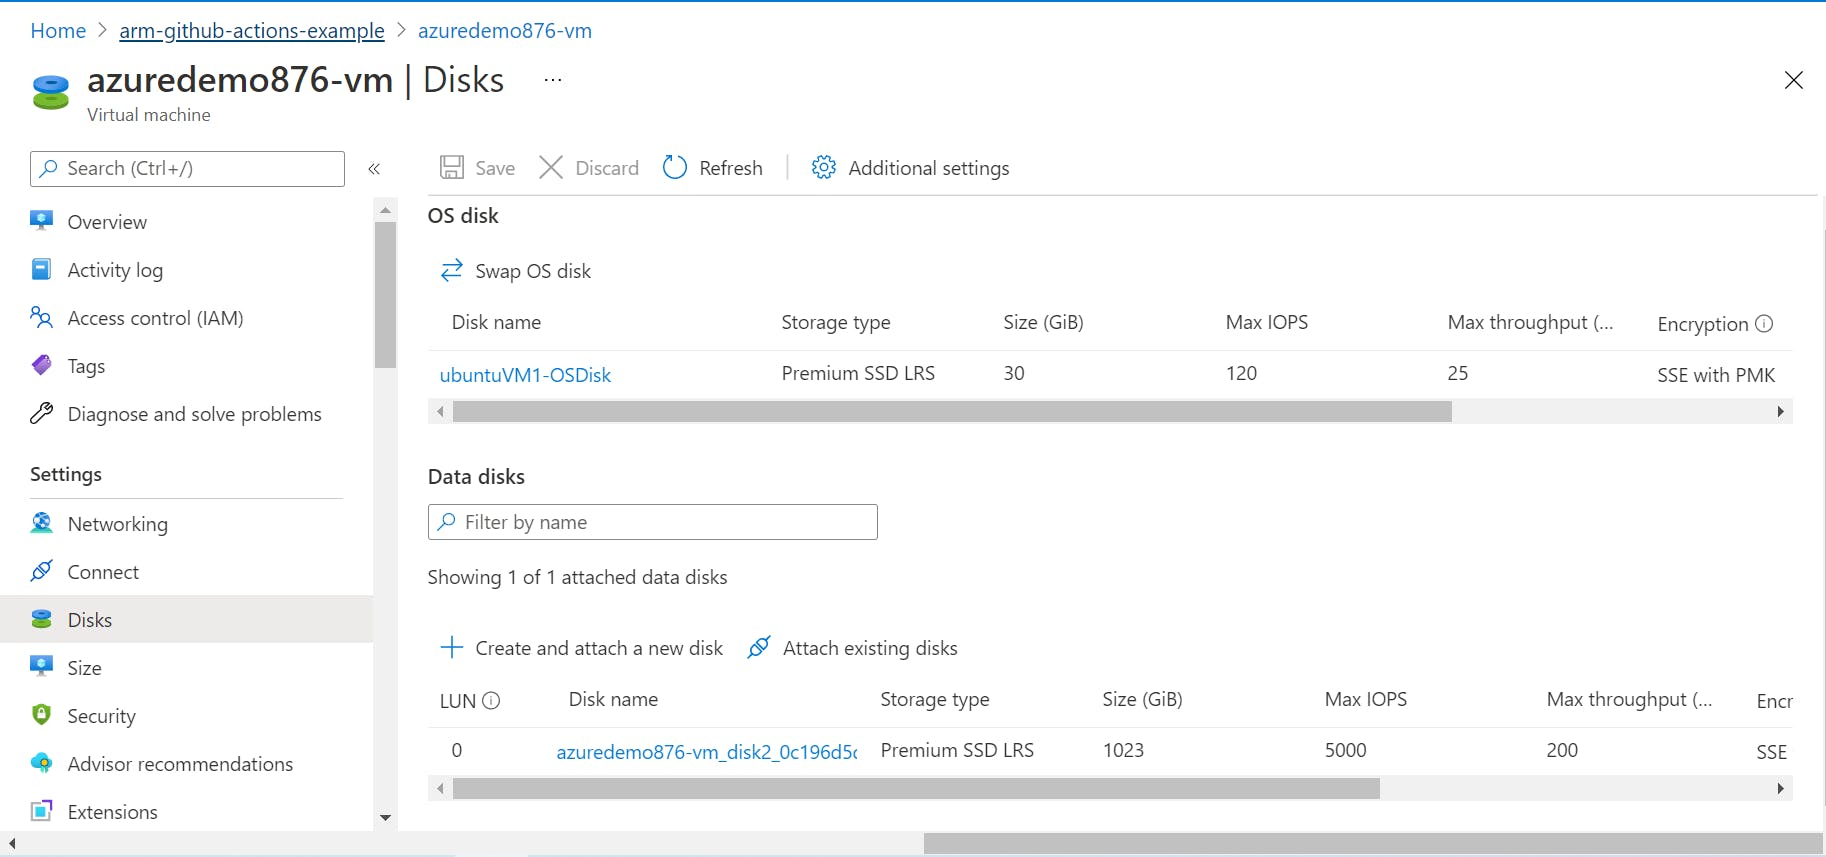
Look at that. Our new data disk was added to our Virtual Machine as we intended with our template. The final section I want us to check is the Deployments blade of our resource group.
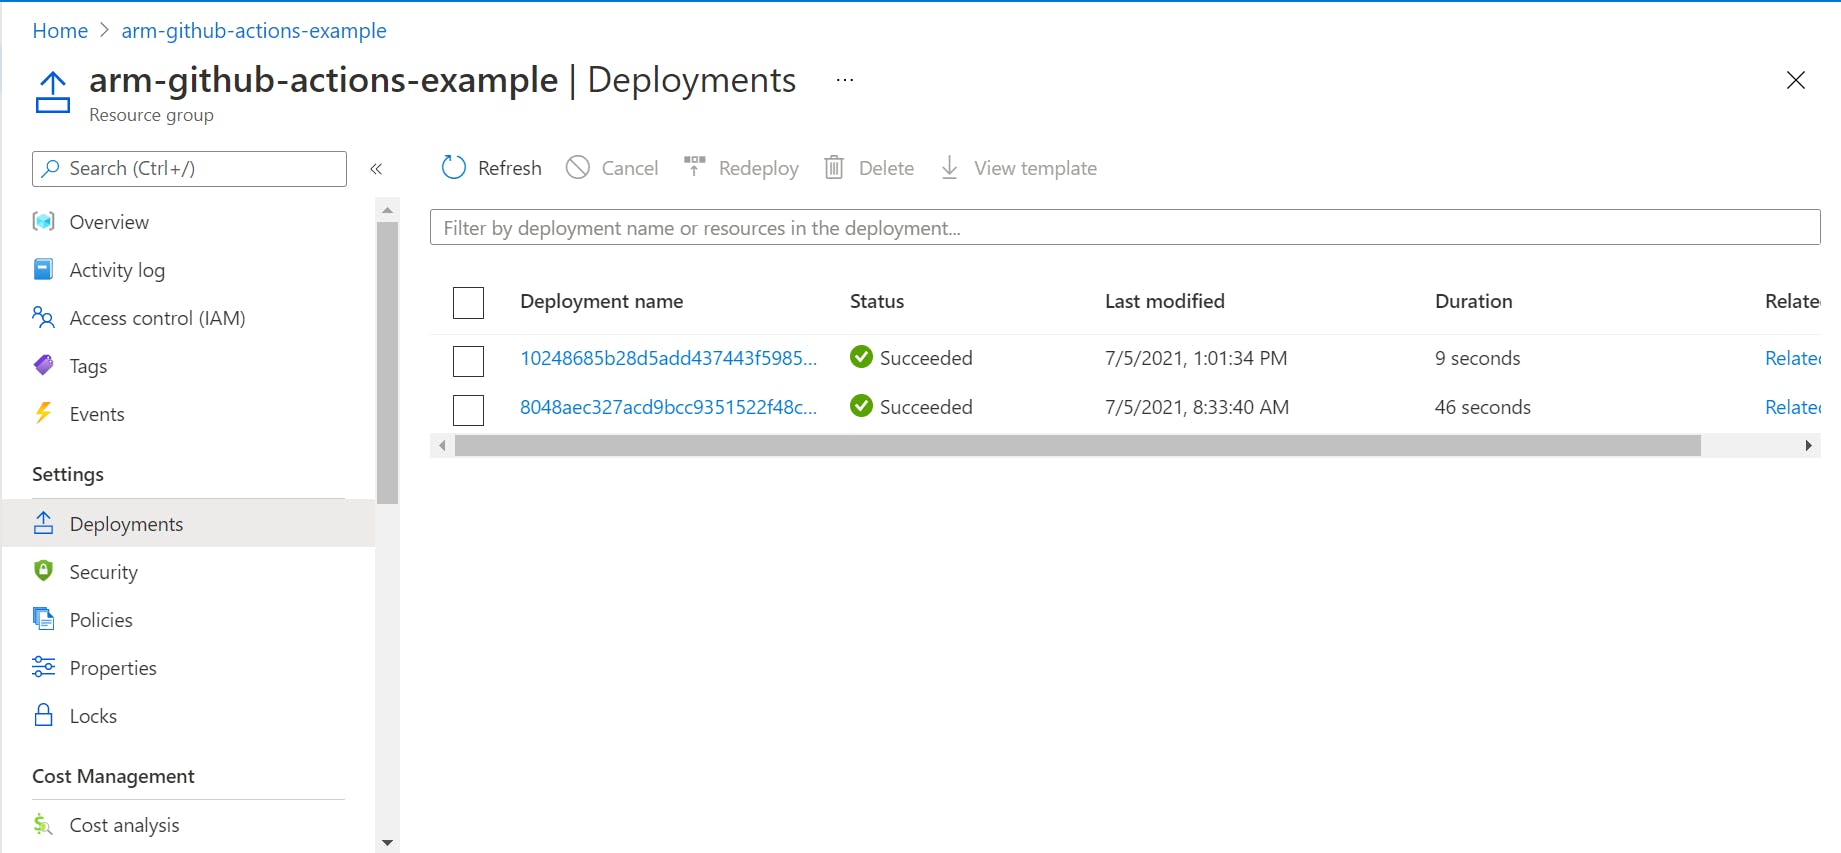
Notice how the Deployment name is a long string that seems to be random. Well, it is because we specified in our main.yaml that the deployment name should be the SHA for the commit that triggered the workflow. If you should cross-check your commits in GitHub with the deployment names in Azure, then these should match up.
Conclusion
In this article, we looked at automating our ARM template deployments using GitHub Actions. ARM templates are really good for documenting your Azure infrastructure and promote consistent, repeatable deployments. GitHub Actions take that a bit further by adding a development workflow to our infrastructure deployment, very similar to how we treat code for our software.